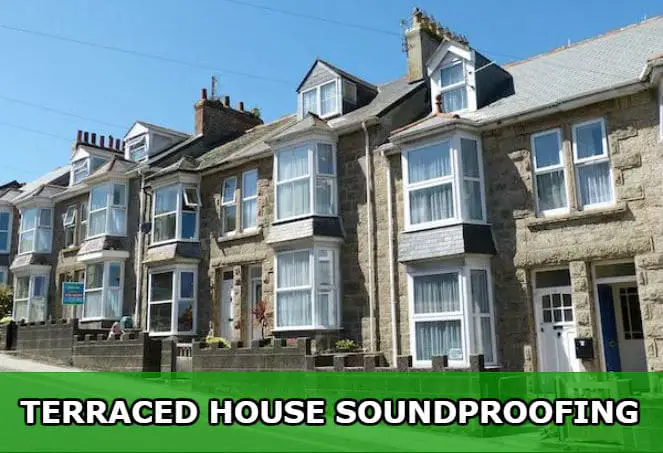
A shared wall with noisy neighbors!? Living in a terraced house isn’t always fun. Here’s how to fix it.
Traveling around the world and admiring architecture can be pretty amazing. Towns are spruced up by the sight of terraced houses, and they photograph well. Yet, living in a house where you share walls with others has its ups and downs.
The perks of living in a terraced house
First off, let’s see what a terraced house is. It is the construction of identical houses built in a row with shared walls between them. Originating in Europe, the Brits call them terrace houses, while in the US you usually hear the terms townhouses or row houses.

The drawback of having a home with shared walls is the noise. Regardless of how old or new the construction is, sooner or later you will suffer from neighbor’s noise.
Where’s the noise coming from?!
You cannot always blame it on the next door neighbors. Other factors contribute to the nuisance:
- Design and structure of the building
- Squeaky floors and/or staircases
- Pipework that travels through the walls
- Heating systems that make a lot of noise when working
How does noise travel!?
Whether through a liquid, solid, or gas, sound needs a carrier to move. It vibrates against that carrier and gets heard next door.
The more layers of material it has to travel through, the fainter it will come on the other side. Thus, if you want to suppress the sound coming through the shared wall or walls, you need to add layers.
How can noise pollution affect your health!?
In time, you’ve probably gotten used to the noise coming from your wall-sharing neighbors. You might even tolerate it to some degree. But research shows that, along the way, noise can produce health issues.

Living surrounded by constant or intermittent noise correlates with:
- Higher risk of heart disease – blood pressure increases and the heart is under a lot of stress.
- Hearing problems- we can only deal with a certain range of sounds. Exposure to loud and constant sounds cause damage to our eardrums.
- Sleeping disorders – noise causes stress which leads to poor sleep, irritation, and fatigue.
Prevent the unwanted effects of noise pollution and ensure a comfortable atmosphere in your terraced home. Soundproof it.
Now, your party wall(s) can have different structures. This means different soundproofing approaches:
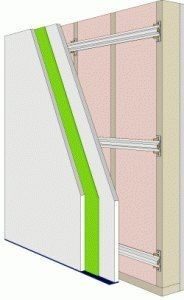
Brick or block layer walls covered with plasterboard – You need to add a structure between the actual wall and the plasterboard. Then, you fill it in with insulation material. *You might lose some room space due to the extra layer of insulation.
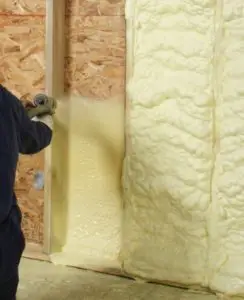
Hollow stud structures – You already have the space needed to add either mineral wool, fiberglass, or foam insulation.
Another option if the noise is bad – build a new wall that is completely separated from the existing party wall. You’ve guessed it, this one is trickier! It reduces the size of your room, and it is more expensive. Plus, the process takes longer and to get insulation between the two walls is not easy.
No matter the situation, you need to cancel the noise one way or another. So let’s start off with the basic principles of soundproofing.
Principles of soundproofing a wall
Understanding the basic principles of soundproofing can ease you into the process. There are 5 principles to consider: mass, absorption, conduction, mechanical decoupling, and resonance.
- Mass – the denser the layer, the better the absorption of sound. To tick the box for this principle, you need to buy a very dense plasterboard. Another trick is to use more than one layer provided you have space.
- Absorption – basically, something to absorb the sound frequencies. If the party wall is decoupled, the insulation will be more effective. Otherwise, if the wall has a stud structure, the effect of the insulation will not be so great. You can use foam, mineral wool, or fiberglass to trap the noise.
- Conduction – refers to the vibration of solid objects when sound travels through. This is what makes the noise pass gently from the neighbor’s house into yours. A wall that has studs covered by plasterboard will favor the transmission of sound.
Plumbing and Flanking Noise soundproofing
Aside from people next door, you may also have to deal with flanking noise. That is noise coming from within the wall like the plumbing.
- Mechanical decoupling – best way to reduce sound conduction. The most effective soundproof walls are those that leave no room for sound to travel, but it is not enough to ensure mechanical isolation alone. Simply decoupling a wall will cancel mid and high frequency sounds. Yet, low frequencies will still get through. You must satisfy at least one other principle of soundproofing for effective results.
- Resonance – a well-insulated wall will still resonate at the right frequency of sound. It will cancel the voices, but the sound of a bass will be able to get through. This happens because low frequencies can make the components of the wall vibrate even so. This is how to address the issue:
- Make sure there is plenty of mass inside the wall and plenty of air. The mass reduces the vibration and the air absorbs the noise.
- Damping reduces resonance and conduction by redirecting and trapping the sound.

Hopefully, you now have an idea about soundproofing and how it works. The next step is to shop around for materials and make an inventory of our tools.
Materials for soundproofing
- Framing materials/struts – you need to build a frame for your insulation material of choice;
- Insulation material – fiberglass, mineral wool, or spray foam;
- Green Glue Noiseproofing Compound – it is an effective noise cushioning material. It goes a very good job and is easy to use. Read more about it here. *You can use other products of choice, this is only a suggestion!
- Green Glue Sealant – used it to seal the gaps between the isolation and the floor, ceiling, and other walls if the case. Here is more info on it. *Optional
- Plasterboard – 2 layers to better hold the insulation material;
- Screws for the plasterboard
Things to consider:
* The number of materials needed varies on your needs, wall size, and thickness of soundproofing.
**Green Glue is not available everywhere. Many suppliers don’t carry it, but you can buy it online. If not, use substitutes like glues, silicones, resins, etc. You can also skip it and add more insulation.
Tools for soundproofing
- Caulk gun for the Green Glue
- Drill
- Rock knife
- Masking tape
- Ruler
- Safety equipment – face mask, gloves, and glasses. *Use them at all times, safety first!

Now it is time to get your hands dirty and prepare for some inevitable frustration.
Steps to soundproofing your wall
- Start by building the frame for the soundproofing material. Use the struts/wooden poles to frame the wall that you want to insulate
To meet the mechanical decoupling principle, you can leave a small gap between the wall and the frame. It will decrease the potential of sound transmission.
To protect the floor, use the masking tape/duct tape.
Position the frame making sure you keep it straight, in line with the marginal walls and ceiling.
Fix the frame by gluing or screwing it on the lateral sides.
If you don’t want to drill holes in your floor, use some spacers.
- Add the insulation material
Measure and cut the material to size or spray foam as needed. The frame you made should contain the layer of material.
If you use fiberglass, make sure to wear the protective gear at all times. It is very dangerous if it reaches your eyes, lungs, or skin.

-
- Add the first layer of plasterboard
Measure and cut to size so that it covers the entire wall. If the wall is wide, use multiple pieces.
Attach the layer and screw it to the wooden frame.
Use the Green Glue sealant to fill in all the gaps. This way no path will remain open for the sound to get through. The sealant must dry for 24 hours.
- Add the second layer of plasterboard
Measure and cut to size to fit the first layer.
Have some fun now! Put the Green Glue all over the plasterboard and attach to the other layer while still wet.
Screw the two layers of plasterboard together.
- *Optional – use the sealant to fill the seams between the two layers of plasterboard
DONE!
You can now breathe with relief; although, you’ve finished the job only from a soundproofing perspective. To make the house nice looking again, some texture and paint will do the trick. But, by now, you can call it a day and call someone to take care of the visual aspect.
Other tips to keep the noise out
Aside from soundproofing the shared wall(s), you can use these methods to reduce noise pollution in your home:
- Furniture – place more pieces of furniture on the shared wall. The sound will have to travel even more layers of material.
- Rugs – absorb the noise coming through the floor. Maybe you have downstairs neighbors as well!
- Windows – better sound canceling windows make a difference. Add a pair of thick curtains and you’re golden.
All in all, if you don’t feel like jumping into a major project like this one, get help from an expert. Terraced houses, although a sight for sore eyes, can become quite stressful. When you have the sensation that your neighbor is living with you, then it is time to insulate!
Happy soundproofing!